How to Use This Tool
- Choose whether to calculate distance or image width.
- Enter the known measurement and the manufacturer’s minimum and maximum throw ratios.
- Set the image aspect ratio and compare the range with the installation manual.
Calculation Method
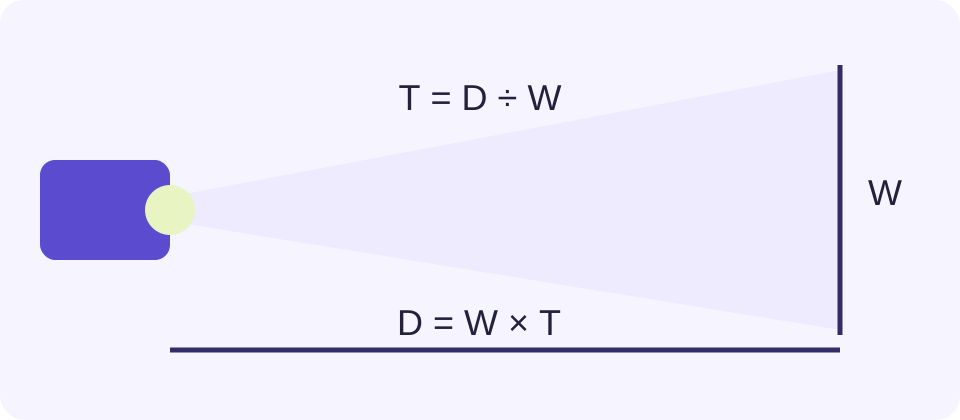
Distance equals image width multiplied by throw ratio. At a fixed distance, width equals distance divided by ratio. Height and diagonal follow the selected aspect ratio.
Worked Example
A 2 m wide image and a 1.2–1.6 throw-ratio range give a 2.4–3.2 m lens-to-screen distance range.
Measure the Projected Picture, Not the Frame
Use the visible horizontal image width. A screen advertised as 100 inches usually describes its diagonal, so entering 100 as its width changes the answer substantially. The screen border and casing are not part of the projected picture. Width, height and diagonal are related by the chosen aspect ratio; a 16:9 image and a 4:3 image of equal diagonal have different widths.
For a 2 m wide 16:9 picture, height is 2 × 9 ÷ 16 = 1.125 m. Its diagonal is √(2² + 1.125²), approximately 2.295 m. Decide which picture region should be filled, especially when the physical screen has a different shape from the projector’s native image.
Use the Published Lens Ratio
Copy the throw ratio for the exact projector and installed lens. A range such as 1.2–1.6 describes possible optical settings, not measurement uncertainty. Use the same lower and upper ratio to compare both ends. A fixed lens can be represented by matching values. A zoom magnification label by itself does not supply the missing throw ratio.
Distance equals width × ratio. For 2 m width and ratios 1.2–1.6, the resulting distance range is 2.4–3.2 m. Measure from the reference specified in the manufacturer’s manual, commonly the lens, not an arbitrary rear housing edge. A ceiling mount screw position is not automatically that same reference.
Understand the Reversed Range at a Fixed Distance
When room placement is fixed, width equals distance ÷ ratio. The smaller ratio produces the larger picture. At a 3 m distance, a 1.2–1.6 lens gives widths from 3 ÷ 1.6 = 1.875 m to 3 ÷ 1.2 = 2.5 m. This reverses the endpoint order compared with the distance calculation.
Keep each screen measurement in a consistent unit. A ratio is unitless: 2 m × 1.5 gives 3 m, while 200 cm × 1.5 gives 300 cm. Do not compare a metre answer with an inch measurement without converting it. A small arithmetic mismatch often comes from width versus diagonal or mixed units, rather than the projector.
| Known Measurement | Ratio Range | Result |
|---|---|---|
| Image width 2 m | 1.2–1.6 | Distance 2.4–3.2 m |
| Distance 3 m | 1.2–1.6 | Image width 1.875–2.5 m |
Leave Installation Checks to the Model Manual
A valid geometric range does not prove the projector will fit safely at that location. Check the model’s allowed image sizes, focus distance, lens offset, lens-shift limits, airflow clearance and mounting instructions. Lens shift and optical zoom perform different jobs. Keystone correction changes image geometry electronically and should not be treated as extra optical placement range.
Ultra-short-throw units need particular care. Their manuals may specify body-to-wall dimensions and height relationships using model-specific references. Do not drill or buy a cabinet from this generic calculation alone. Recheck the manufacturer’s installation diagram and physically confirm the position before fixing a mount.
Check the Picture After Placement
Use a temporary test image to verify actual width, height, focus and edge alignment at the proposed position. Record the setting that works and keep adjustment room where the manufacturer permits it. The calculator cannot assess your wall, ambient light, screen gain, brightness or structural mounting suitability, and it does not recommend a projector model.
When preparing slides or video for that screen, compare the content’s ratio with the projected picture. Letterboxing and cropping can explain why the active content does not occupy the full screen even when the projector’s optical geometry is correct.
What the Result Means
Geometry is not an installation approval. Lens reference, offset, shift, focus range, brightness, clearances and ultra-short-throw placement need the exact model manual.
Common Questions
Is Screen Diagonal the Width Input?
No. Width is the horizontal projected picture dimension. The aspect ratio links width, height and diagonal.
Does a Lower Throw Ratio Make the Image Larger?
At the same lens-to-screen distance, yes. Dividing that distance by a smaller ratio gives a larger image width.